> ## Documentation Index
> Fetch the complete documentation index at: https://docs.suprsend.com/llms.txt
> Use this file to discover all available pages before exploring further.
# Create a Teams app and add the vendor
> Register an Azure bot, wrap it in a Teams app package, and save the bot credentials on the Microsoft Teams vendor in SuprSend.
Before you send to Microsoft Teams, create a Teams app and save its **App ID**, **password**, **App Type**, and **Tenant ID** on the Microsoft Teams vendor form in SuprSend.
For bot delivery you also wrap the bot in a Teams app package that customers install. That's what makes the message show *your* name and icon, and what lets you DM people. In the [customer's Teams app](/docs/microsoft-teams-customer-bot) use case they create their own copy.
You'll need a Microsoft 365 account that can create apps.
Since **31 July 2025**, every new Azure bot is **single-tenant**. That's fine — customers still get your bot by installing your Teams **app**. Existing multi-tenant bots keep working.
On the SuprSend vendor form, set **App Type** to `Single tenant` for any bot created after that date. Picking `Multi tenant` still returns an access token, but every send then fails with `401 Authorization has been denied for this request`.
This is separate from **Supported account types** in Azure, which controls which directories can install your app. Set that to multiple tenants if customers will install it (see step 4).
## Create the Teams app
### 1. Create the app
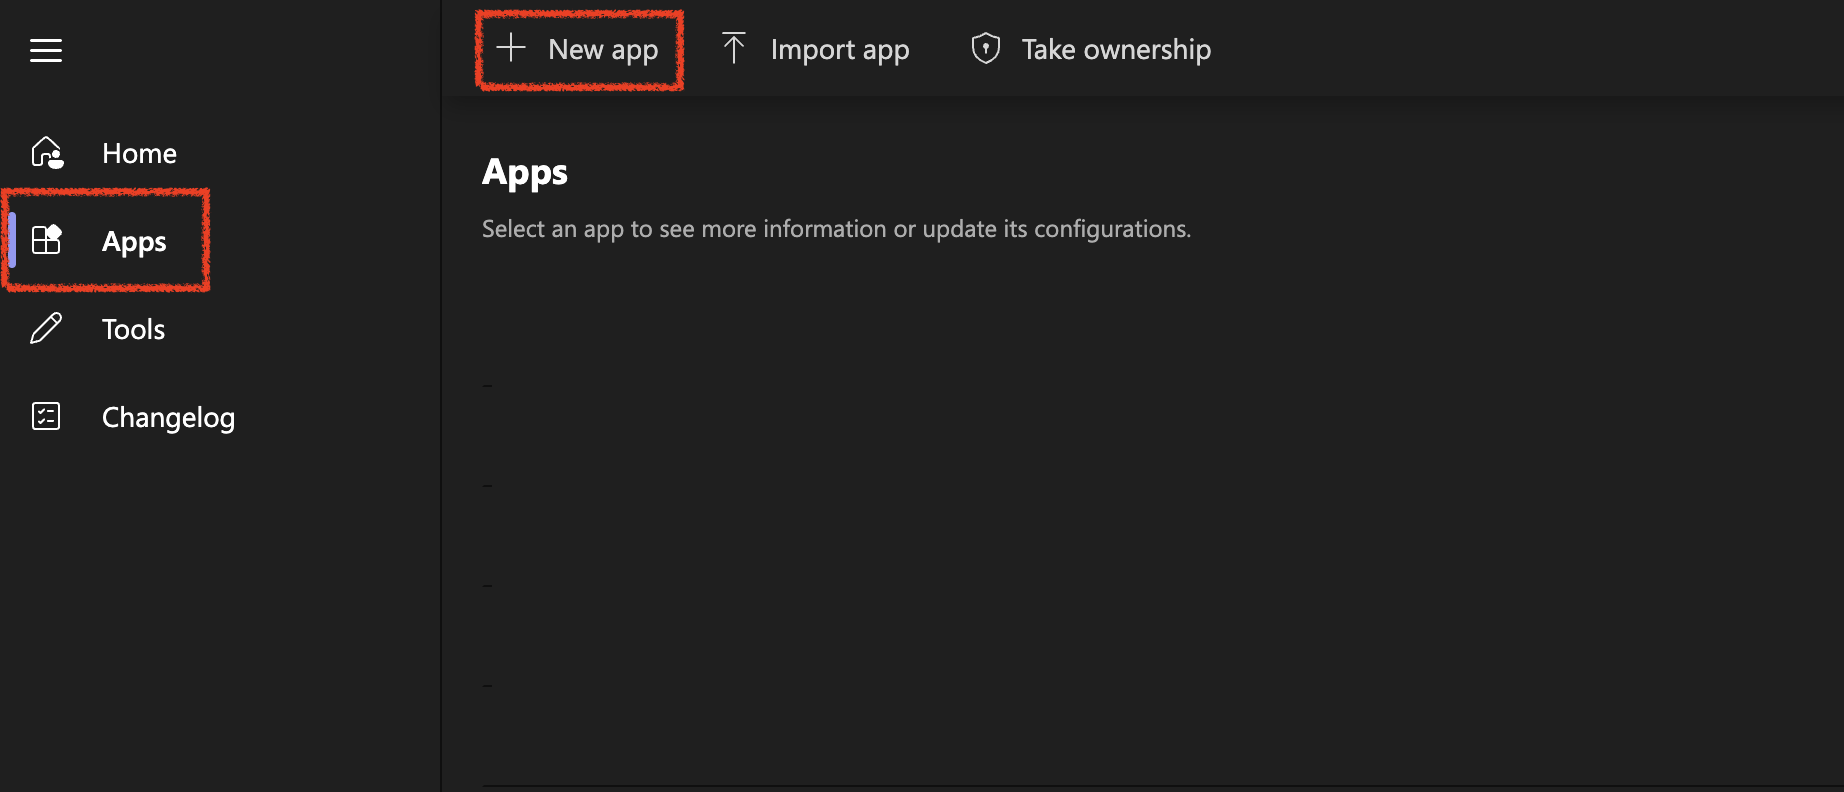
Open the [Teams Developer Portal](https://dev.teams.microsoft.com/) → **Apps** → **+ New App**. Name it something people will recognize in the Teams app list, such as `Incident Alerts`.
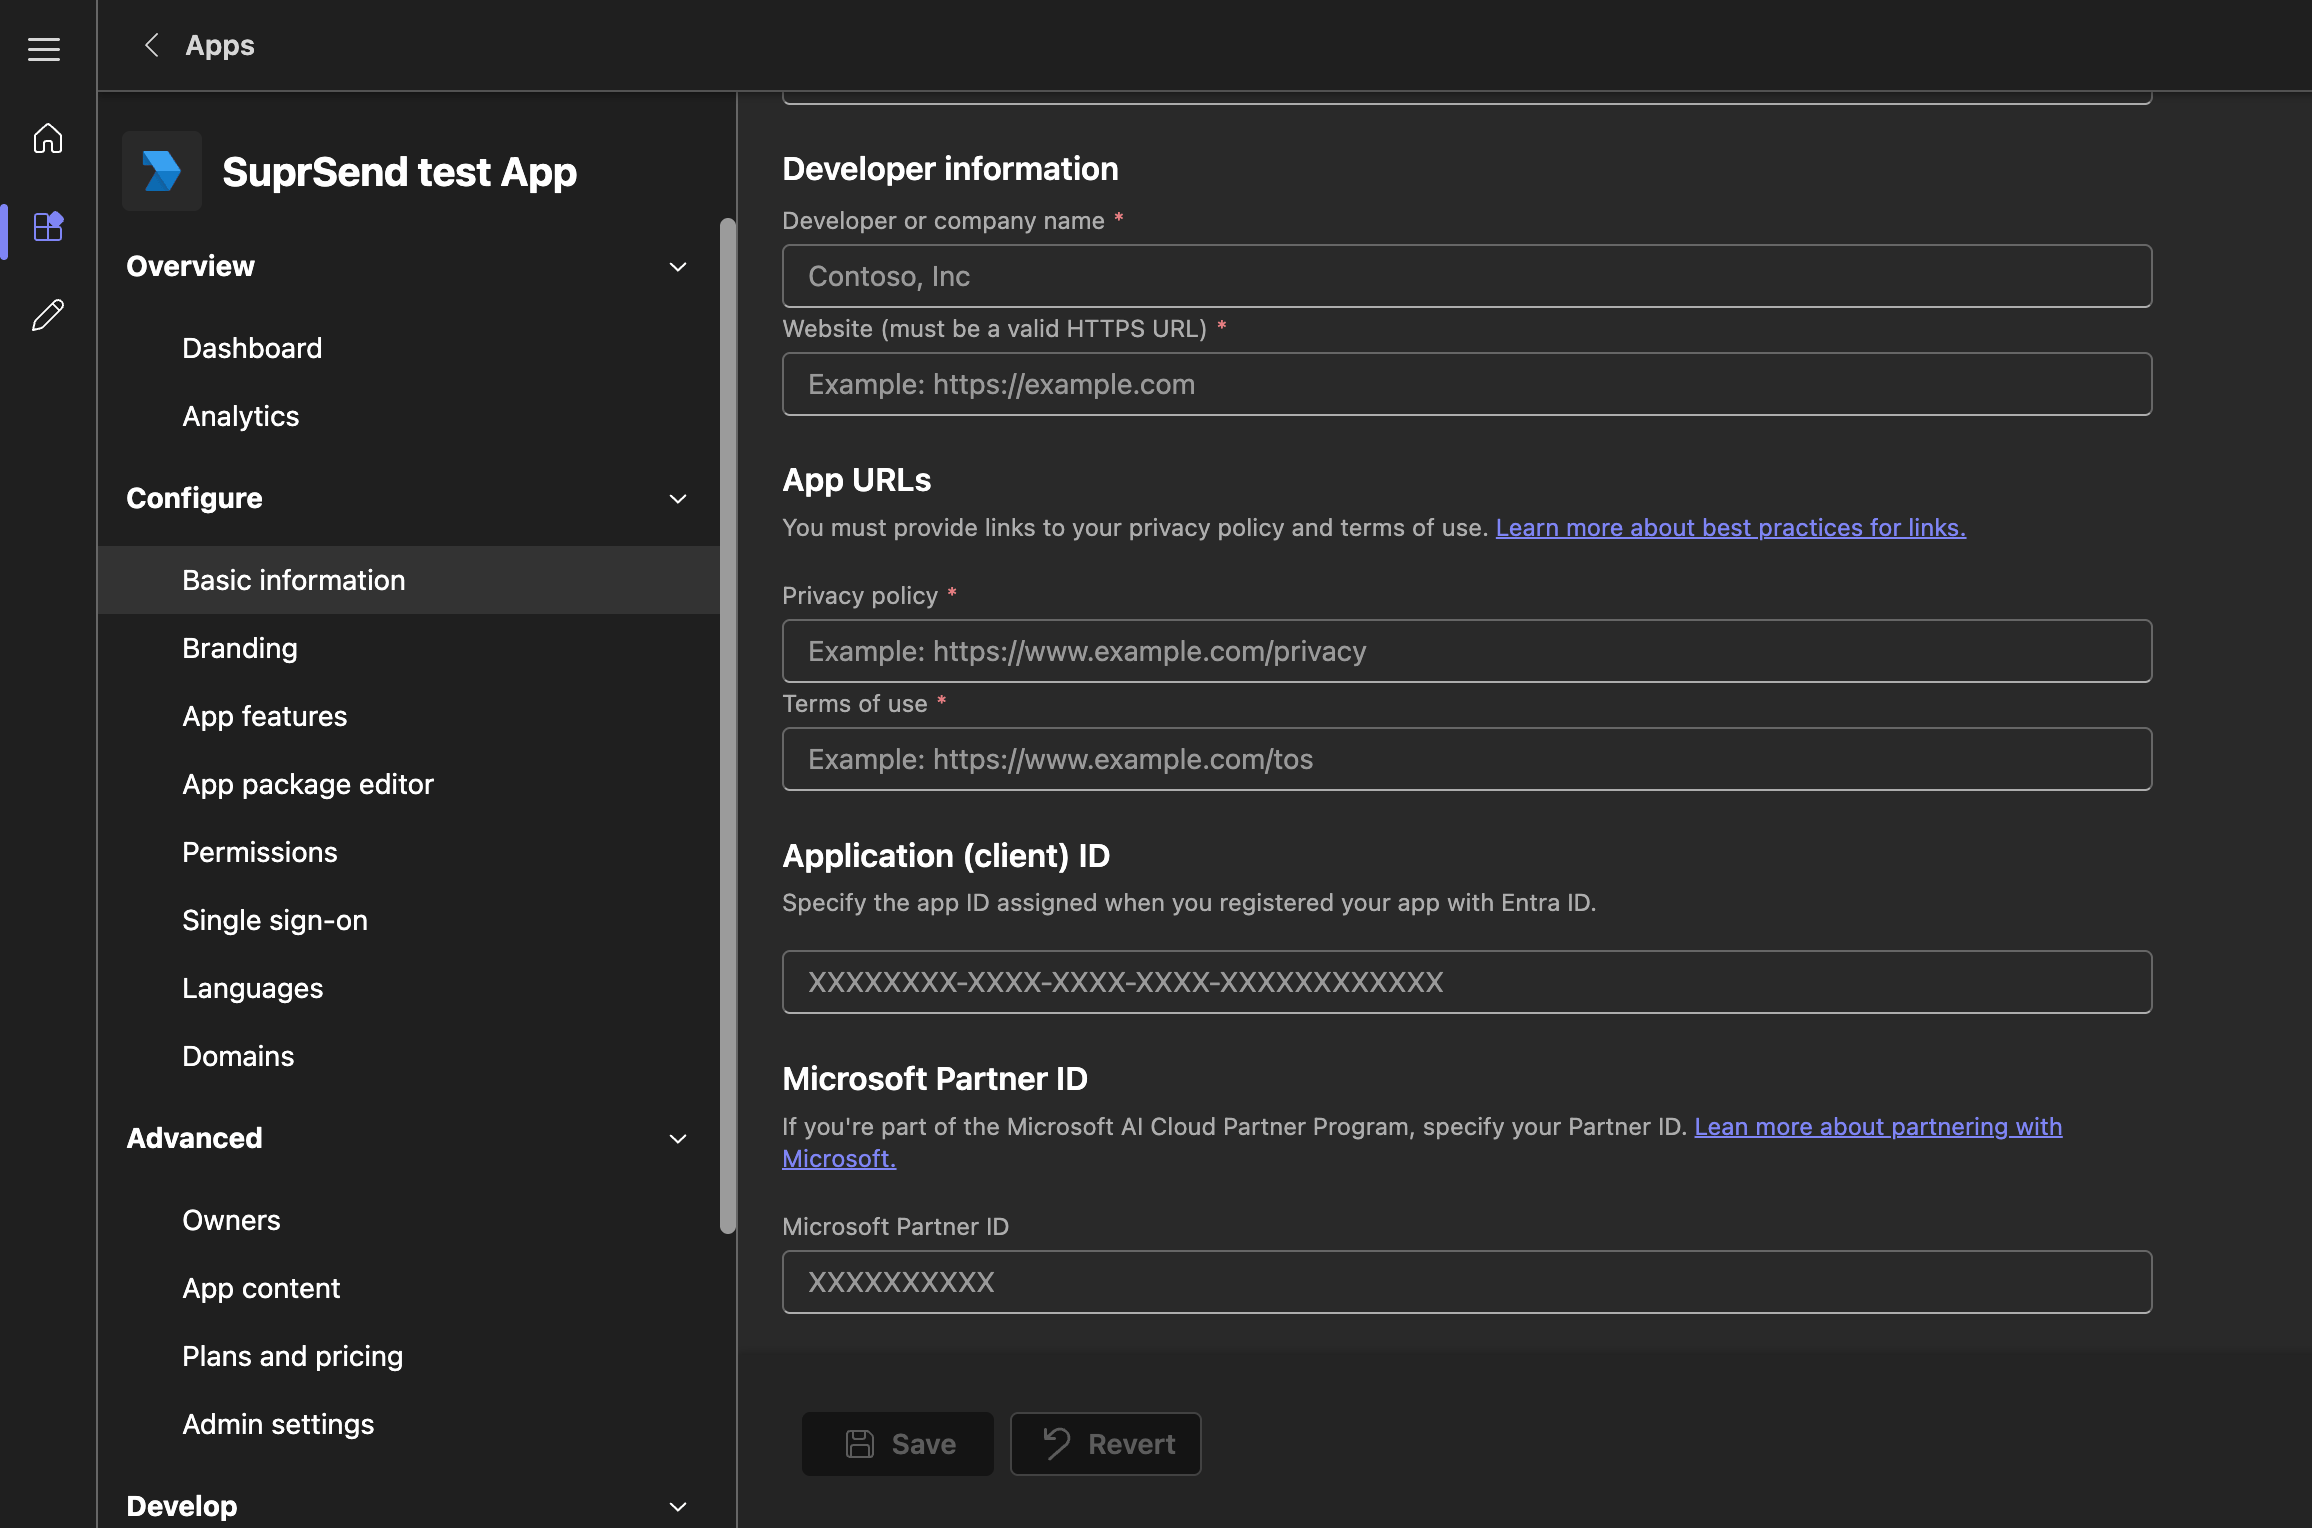
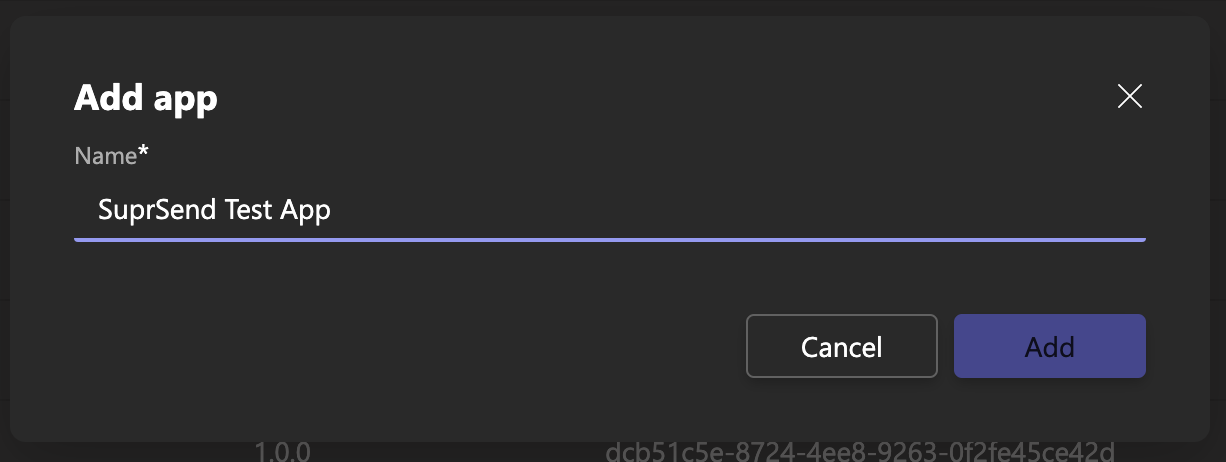 You'll land on the **Basic information** form shown below. Fill in the app name, descriptions, company name, and the website, privacy policy, and terms of use URLs. All three URLs must be `https://` — an `http://` link or a missing one blocks publishing.
 ### 2. Create the bot and a client secret
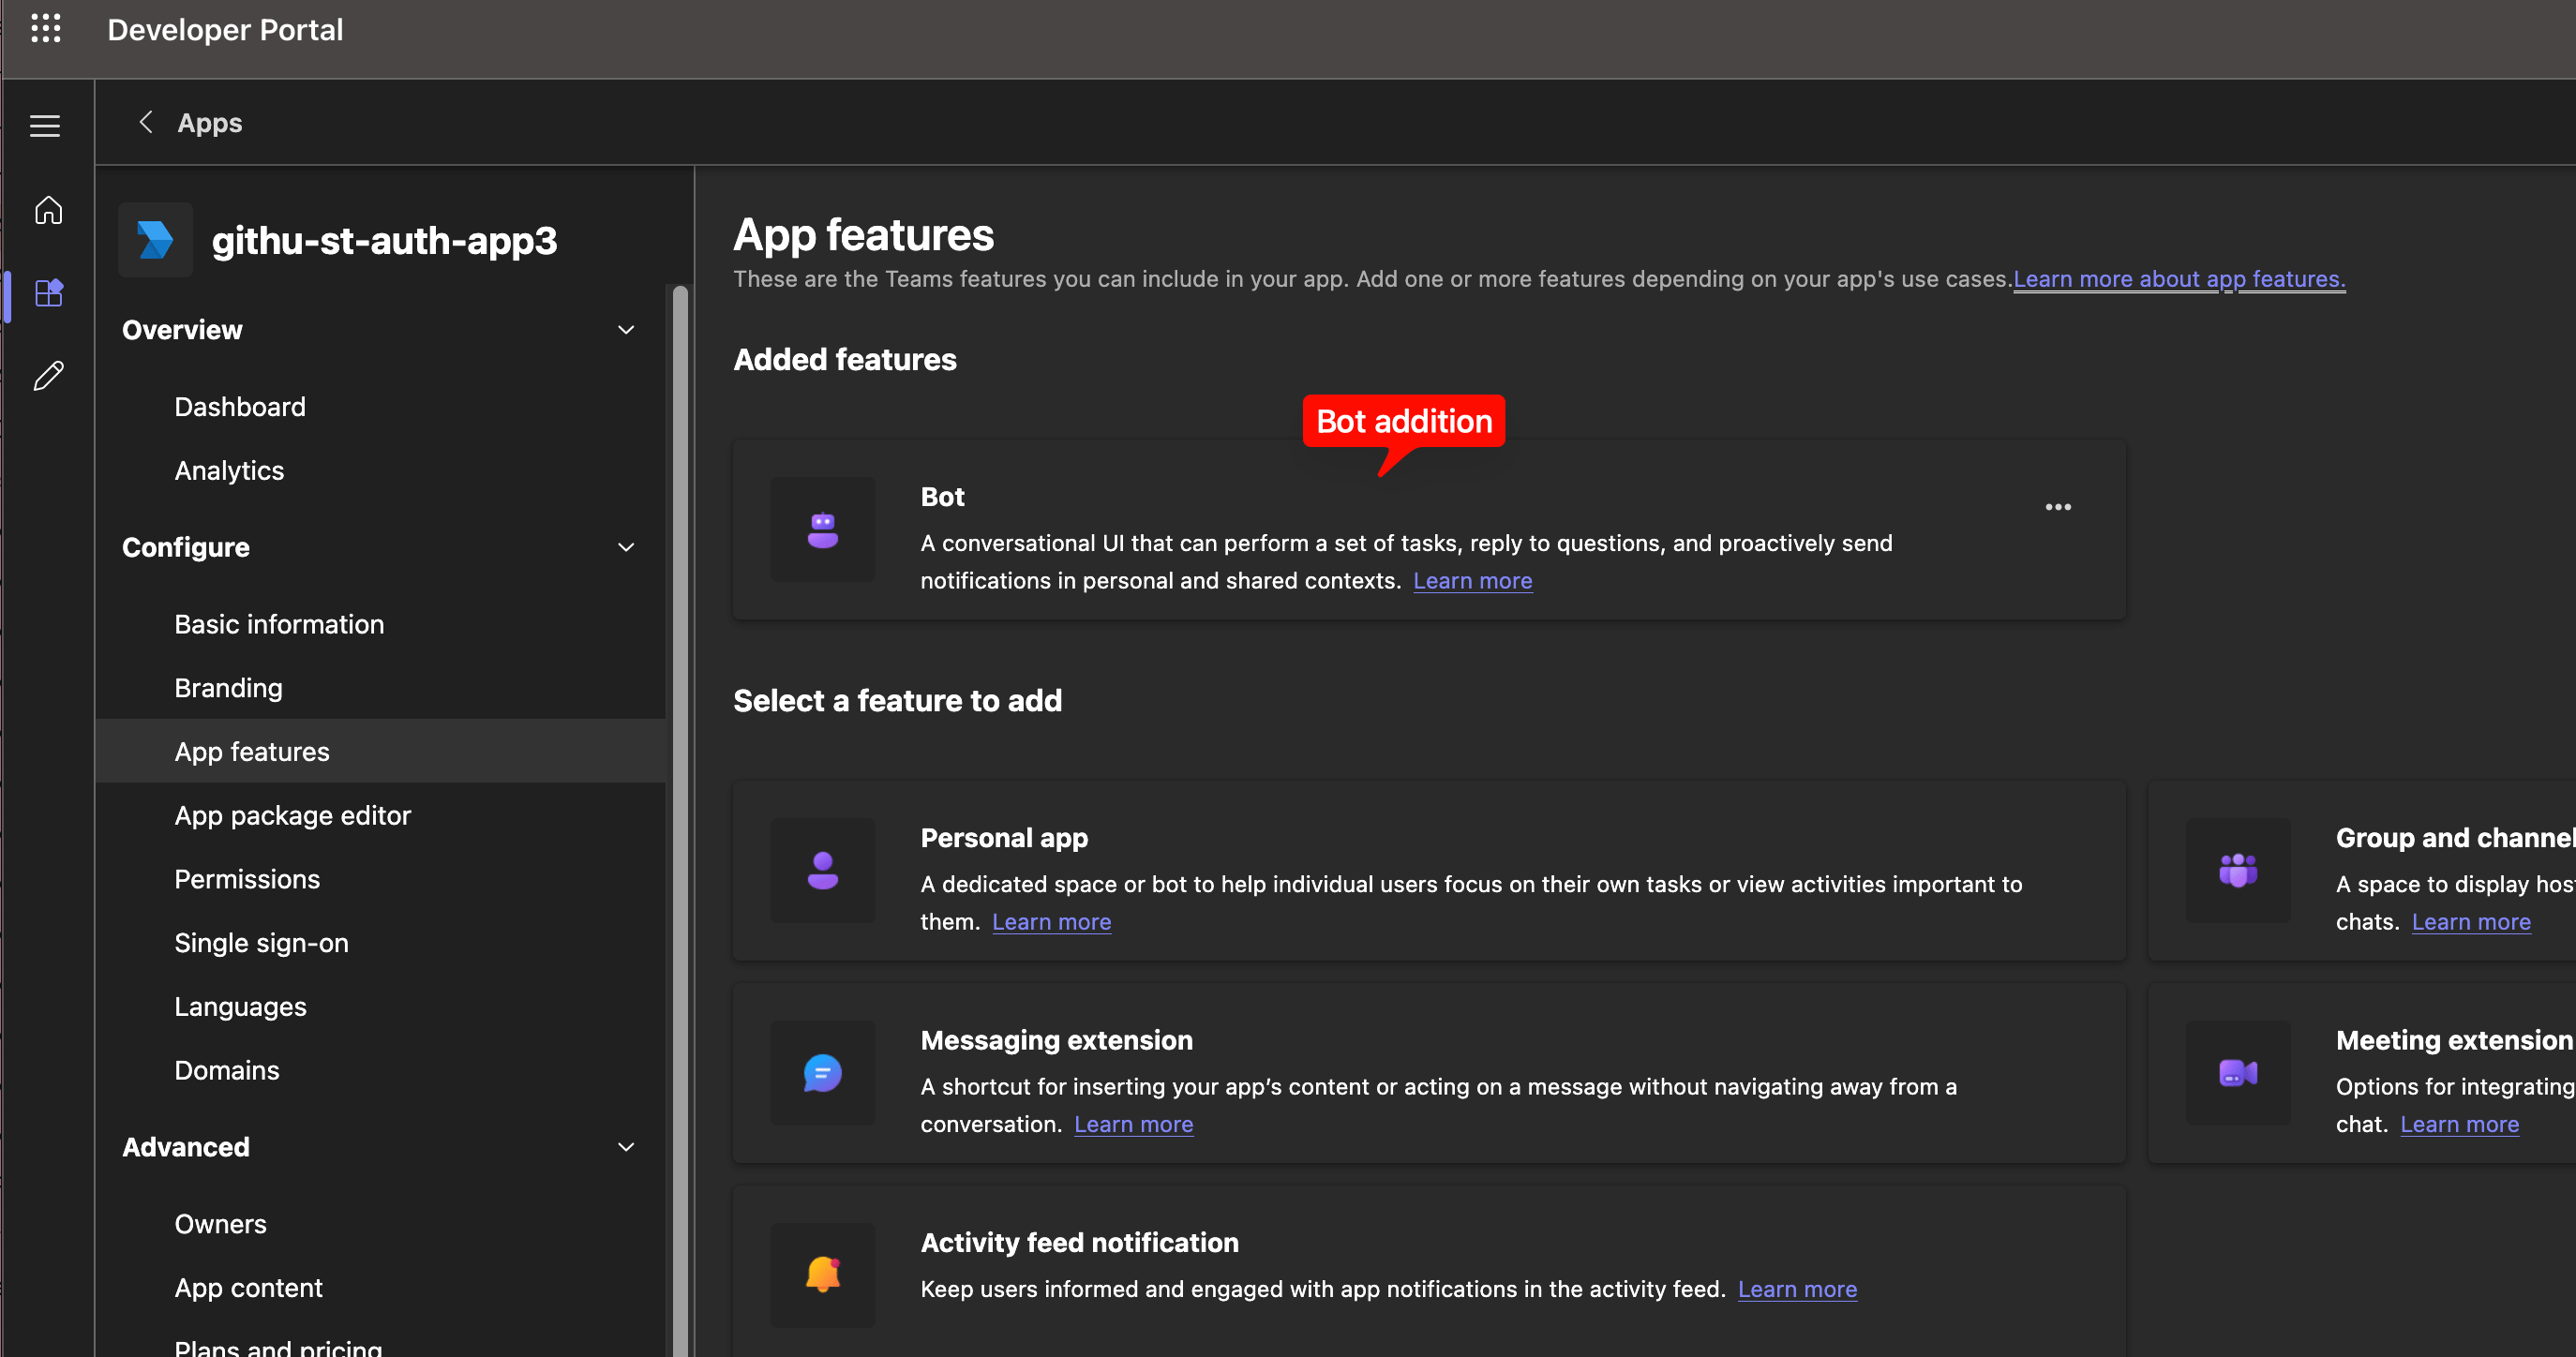
Left panel → **App features → Bot**. Pick an existing bot or **Create a new bot**. On the [bot page](https://dev.teams.microsoft.com/bots), **+ New Bot**, name it, **Add**.
Leave the messaging endpoint blank unless you also handle inbound activity (for example @mentions). Select **Microsoft Teams** as the channel.
### 2. Create the bot and a client secret
Left panel → **App features → Bot**. Pick an existing bot or **Create a new bot**. On the [bot page](https://dev.teams.microsoft.com/bots), **+ New Bot**, name it, **Add**.
Leave the messaging endpoint blank unless you also handle inbound activity (for example @mentions). Select **Microsoft Teams** as the channel.
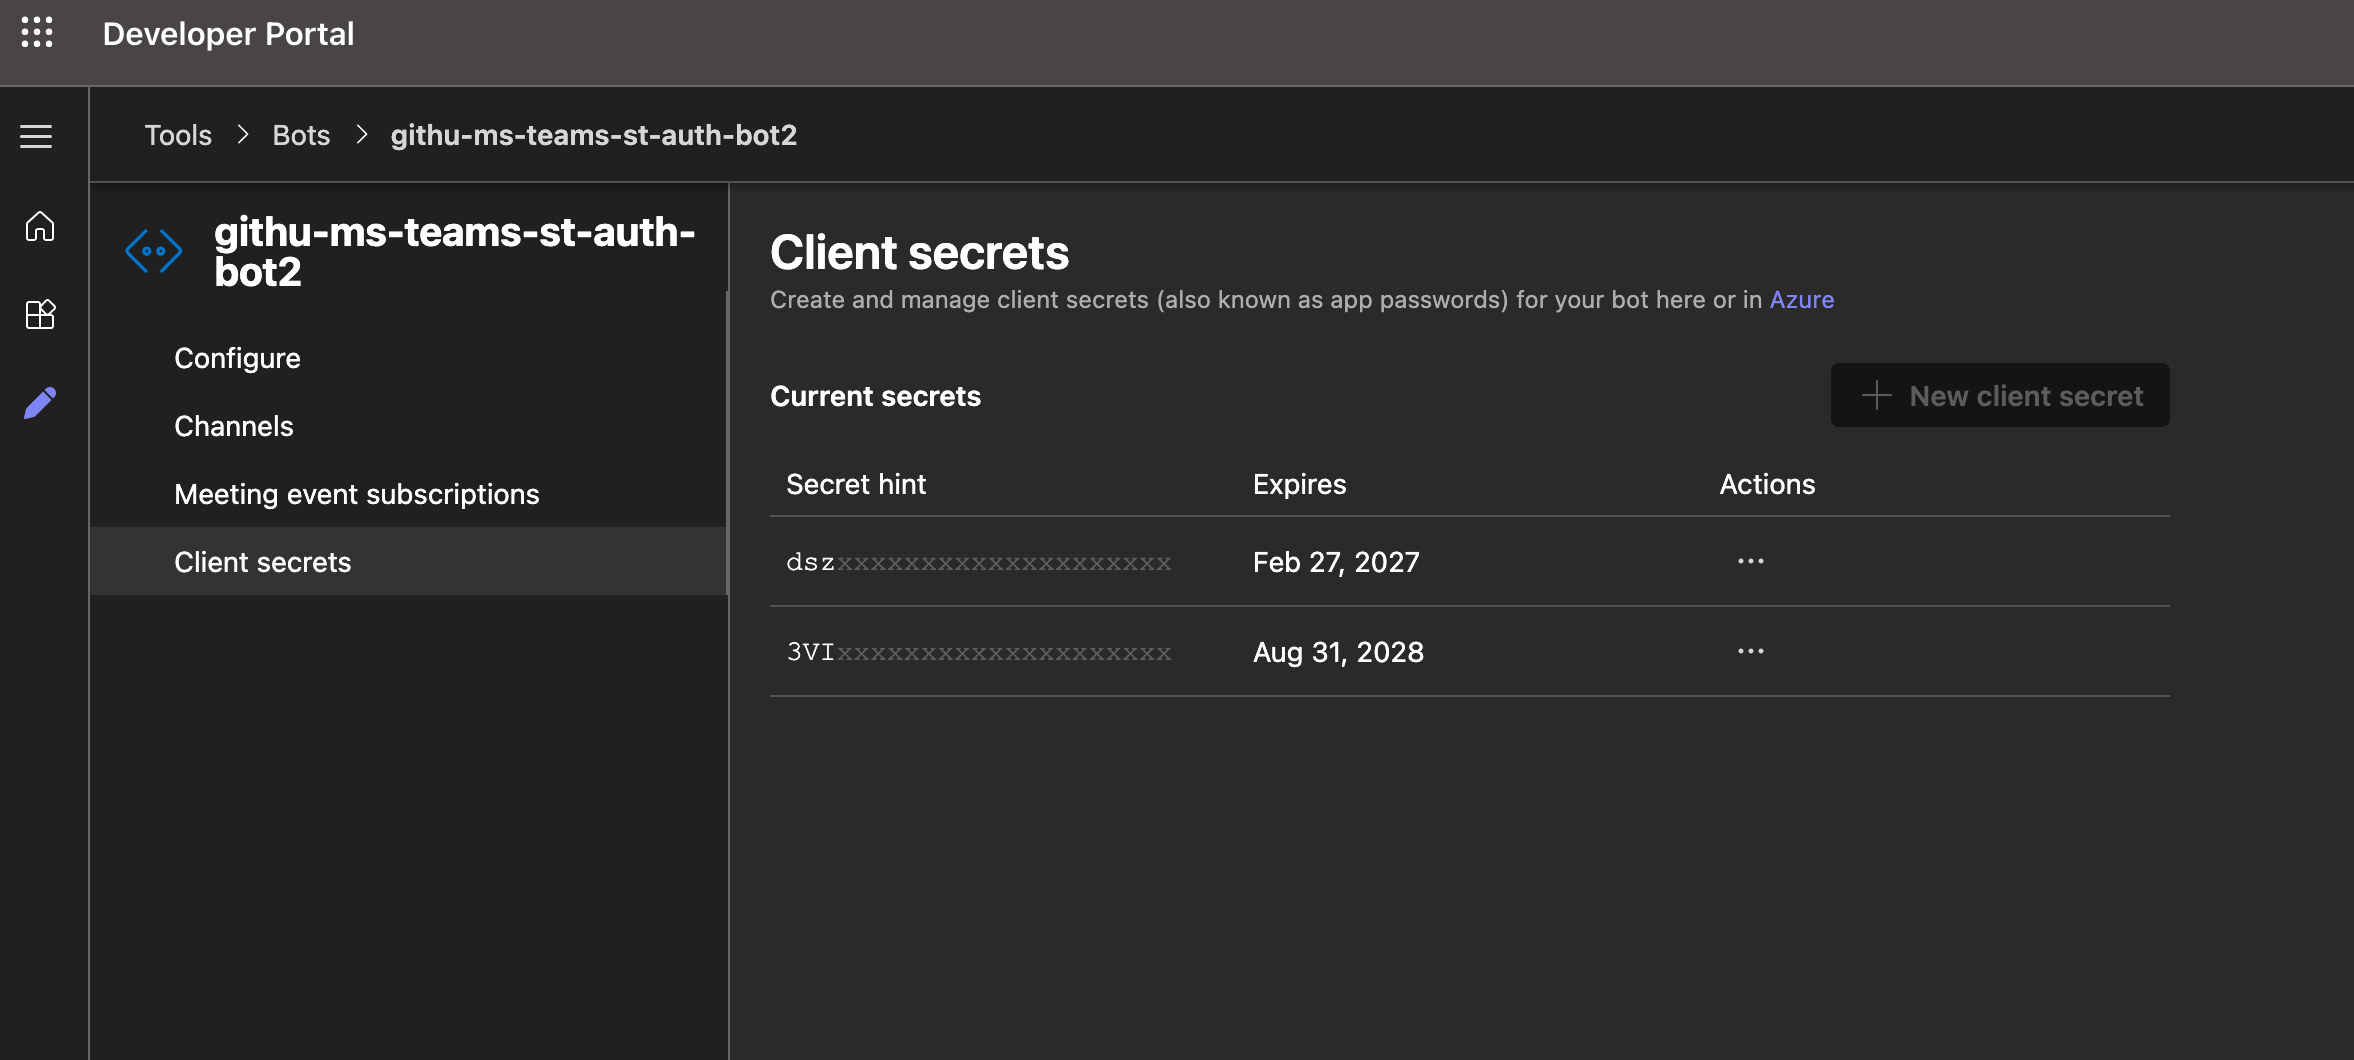
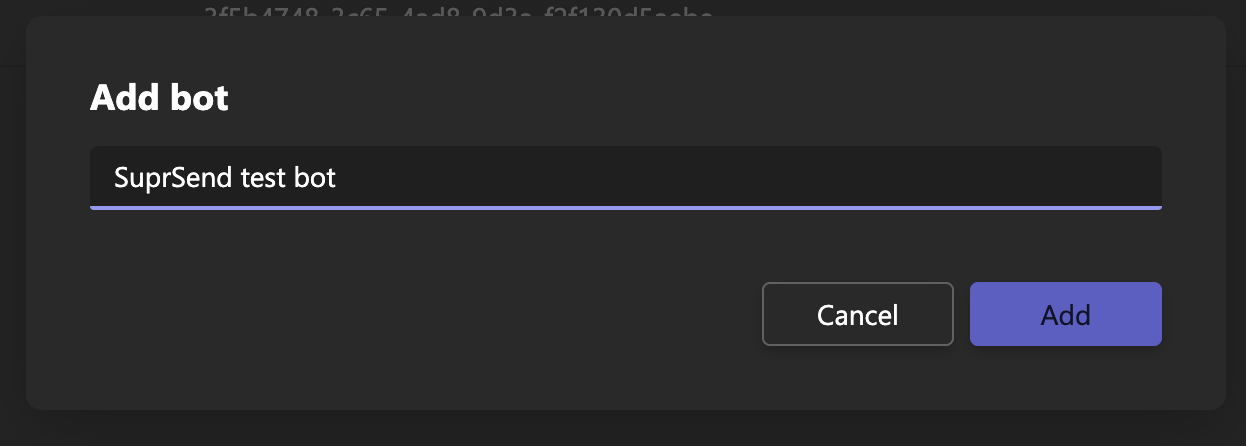 Then create a **client secret**. It is shown only once — save it. That value is **Password** on the SuprSend vendor form.
 ### 3. Attach the bot and set scopes
Select **App features → Bot**, then pick the bot you just created. Its **Application (client) ID** is filled in on **Basic information** and cannot be edited there. You will need that value when you configure the vendor in SuprSend.
### 3. Attach the bot and set scopes
Select **App features → Bot**, then pick the bot you just created. Its **Application (client) ID** is filled in on **Basic information** and cannot be edited there. You will need that value when you configure the vendor in SuprSend.
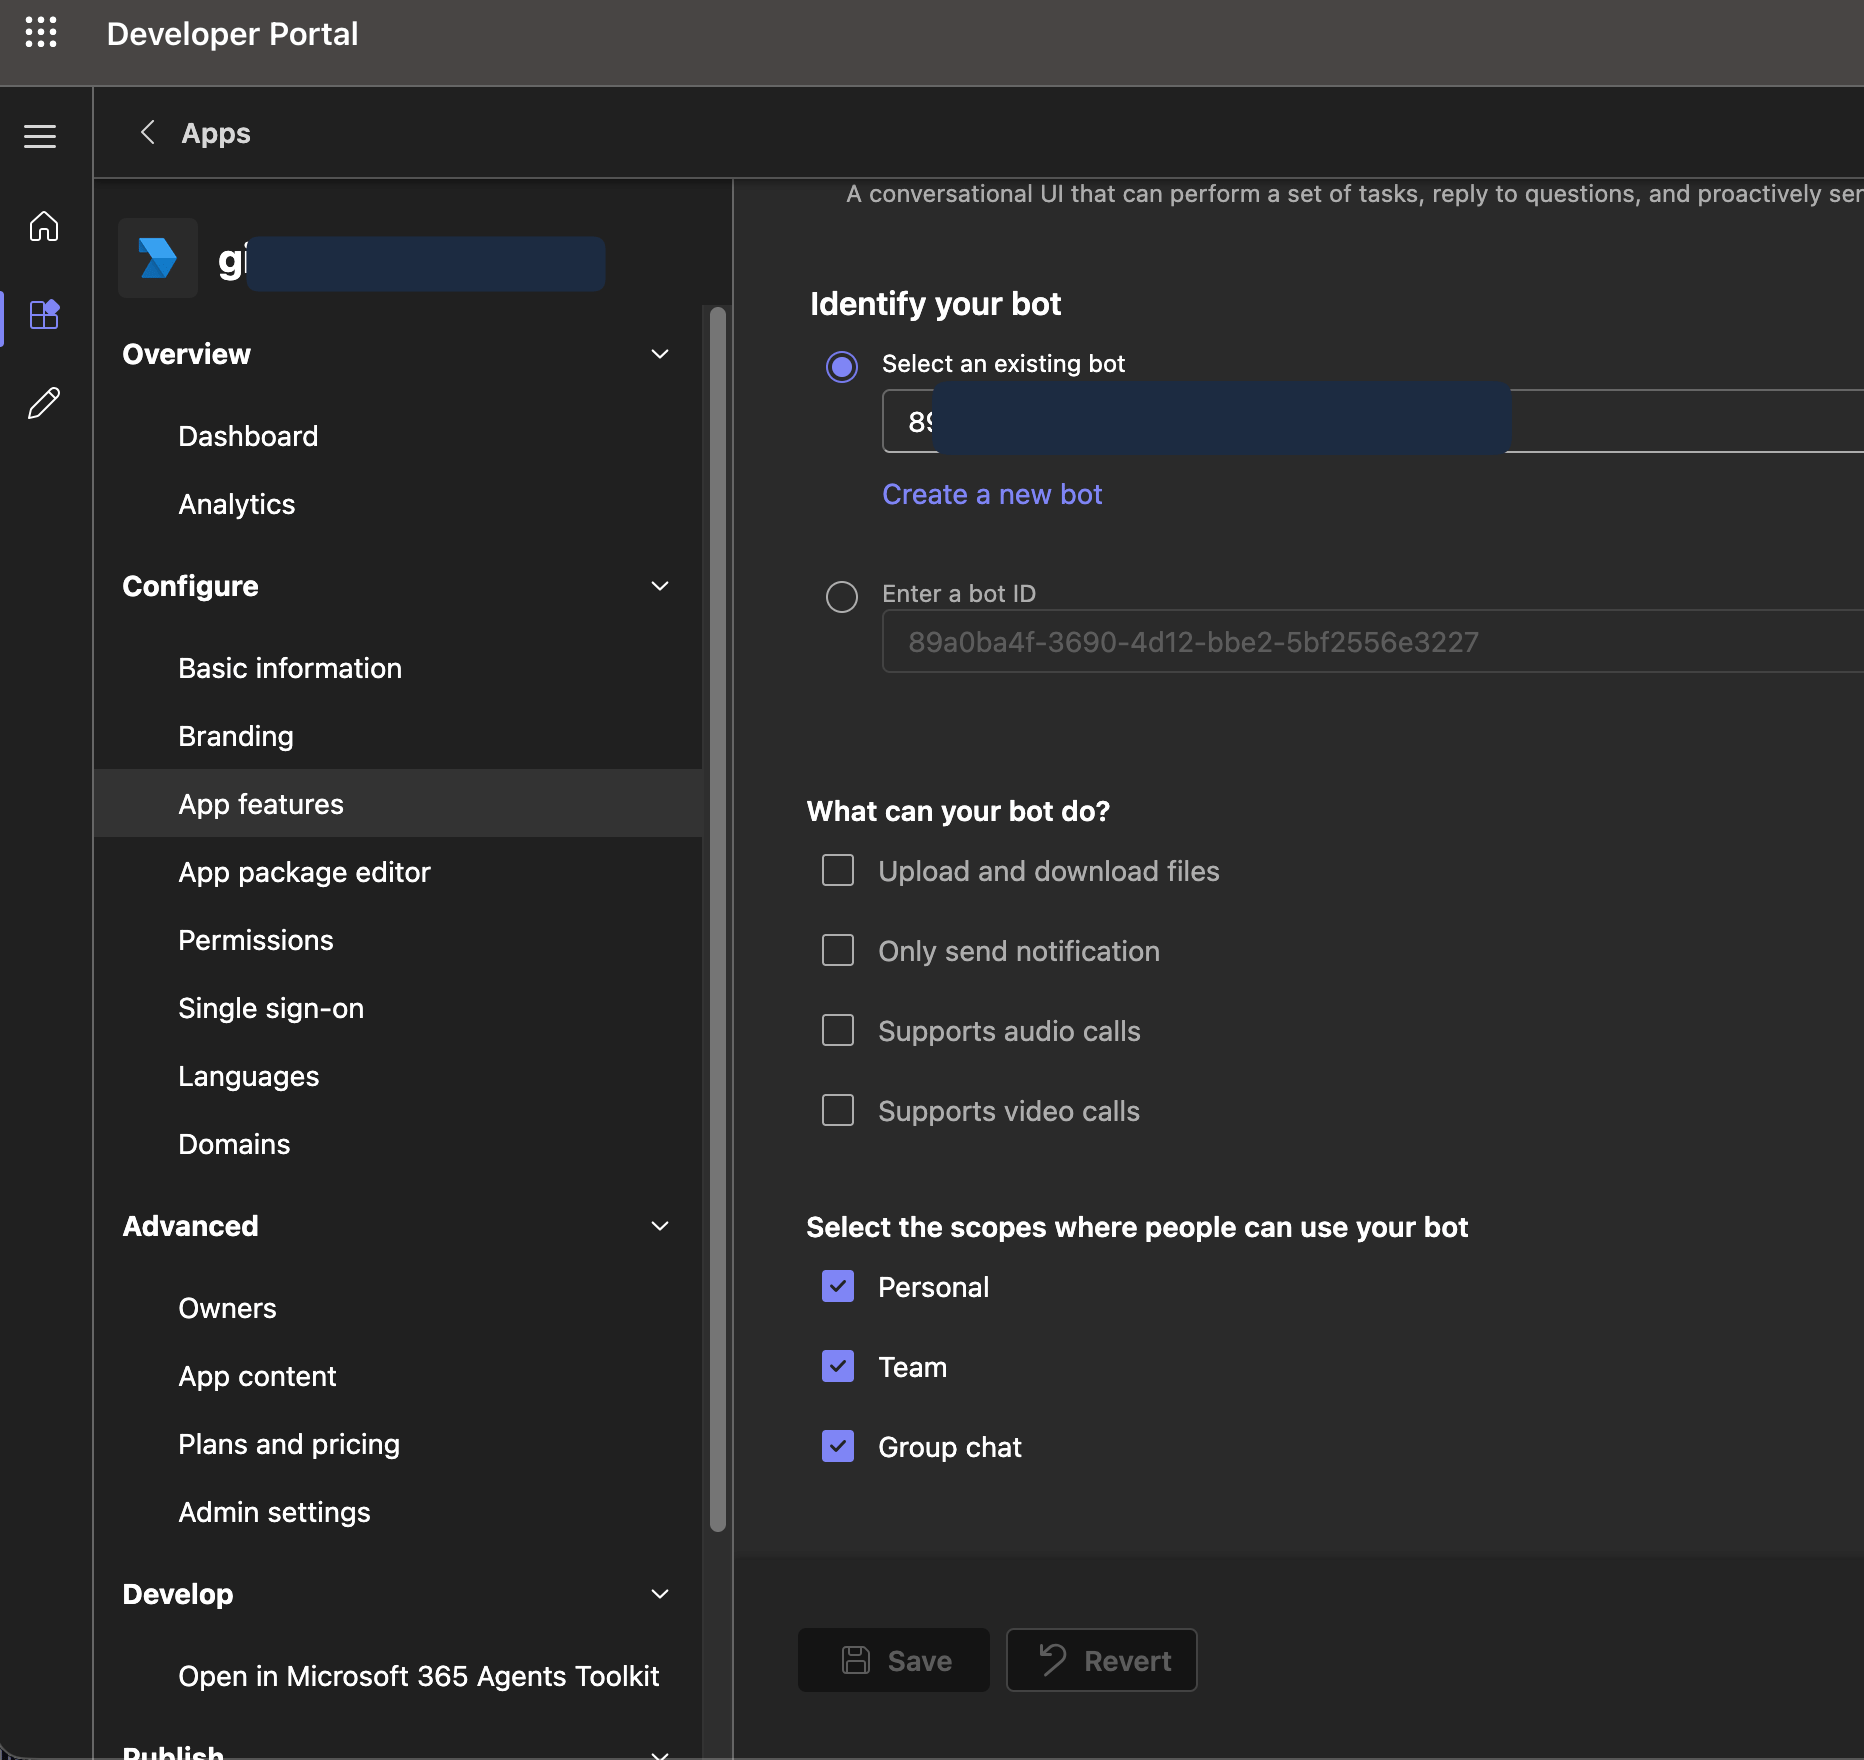
 Under **What can your bot do?**, choose **Only send notifications** unless you also handle inbound messages. Add the scopes you'll use:
* **personal** — DMs
* **team** — channel posts
* **group chat** — group chats
Save.
Under **What can your bot do?**, choose **Only send notifications** unless you also handle inbound messages. Add the scopes you'll use:
* **personal** — DMs
* **team** — channel posts
* **group chat** — group chats
Save.
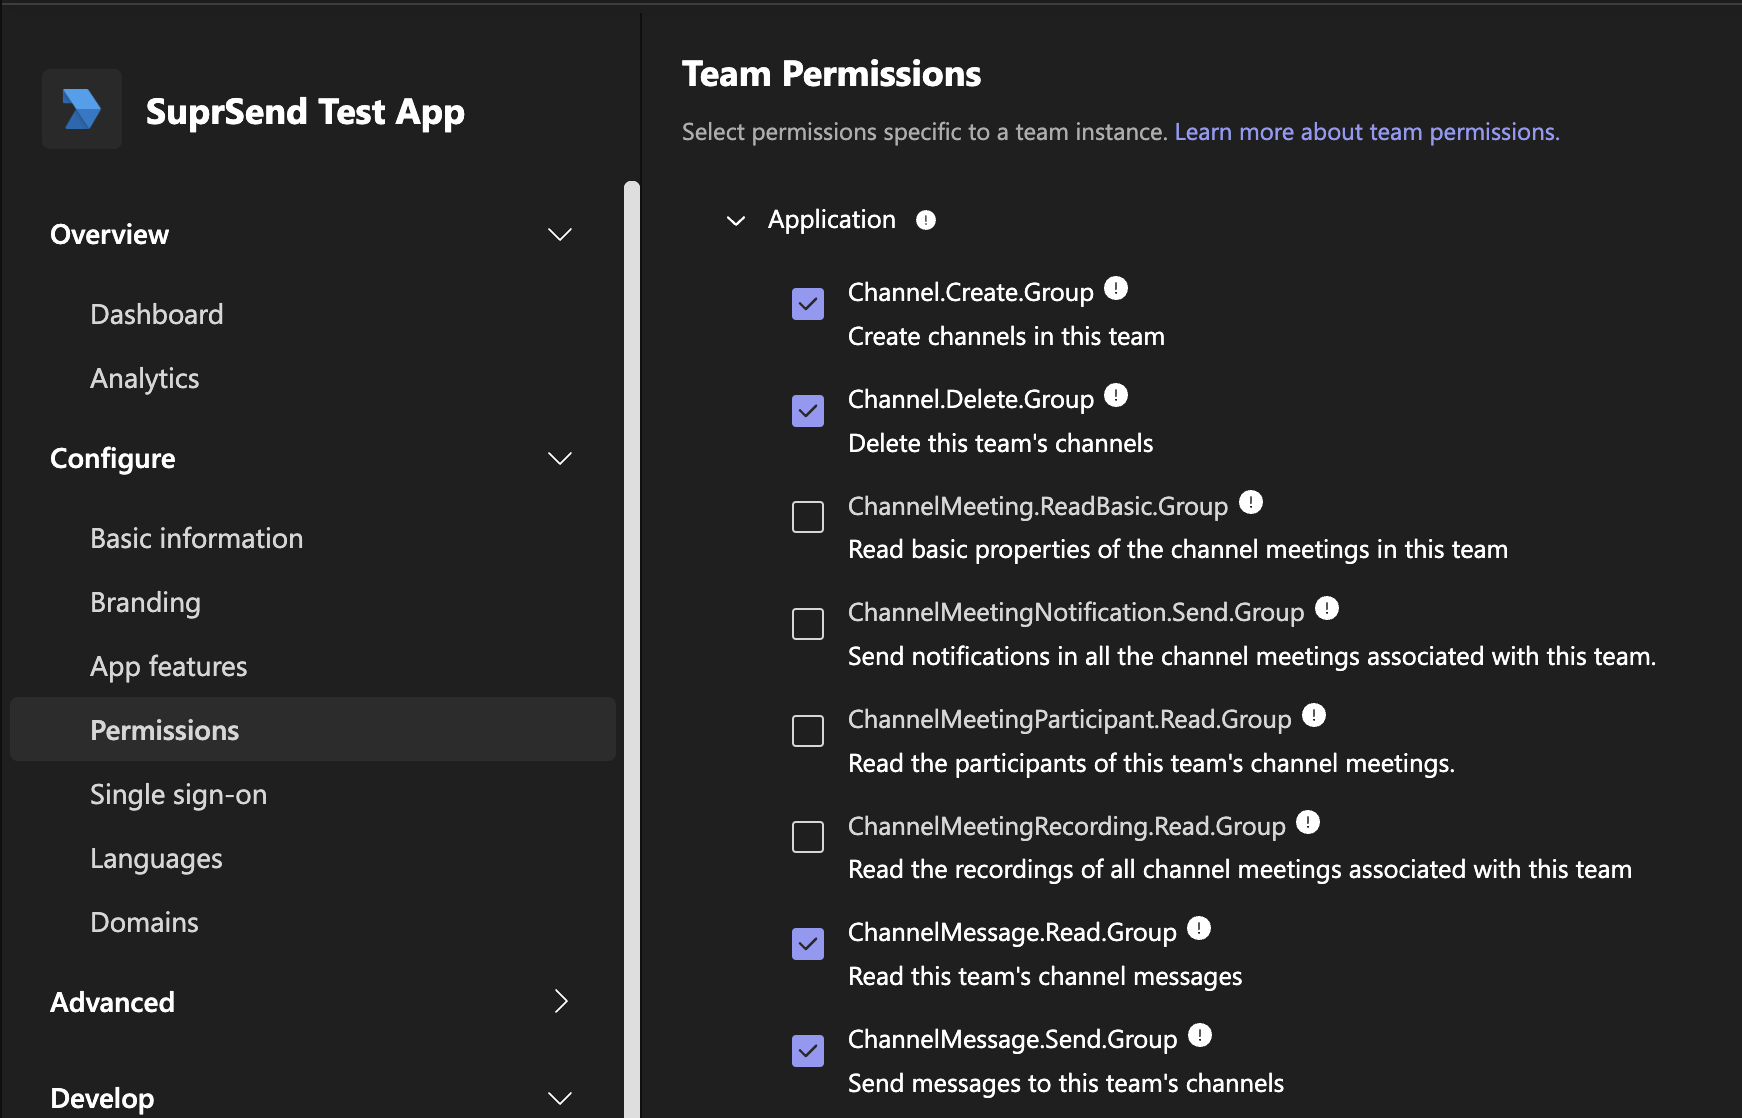
 Add these application permissions:
| Section | Permissions |
| - | - |
| Team Permissions → Application | `Channel.Create.Group`, `Channel.Delete.Group`, `ChannelMessage.Read.Group`, `ChannelMessage.Send.Group`, `TeamsActivity.Send.Group` |
| Chat/Meeting Permissions → Application | `ChatMessage.Read.Chat`, `ChatMessage.Send.Chat` |
| User Permissions → Application | `TeamsActivity.Send.User` |
If you need Entra object IDs from the roster (stable `user_id`s for DMs), include a resource-specific consent permission such as `TeamMember.Read.Group`.
Add these application permissions:
| Section | Permissions |
| - | - |
| Team Permissions → Application | `Channel.Create.Group`, `Channel.Delete.Group`, `ChannelMessage.Read.Group`, `ChannelMessage.Send.Group`, `TeamsActivity.Send.Group` |
| Chat/Meeting Permissions → Application | `ChatMessage.Read.Chat`, `ChatMessage.Send.Chat` |
| User Permissions → Application | `TeamsActivity.Send.User` |
If you need Entra object IDs from the roster (stable `user_id`s for DMs), include a resource-specific consent permission such as `TeamMember.Read.Group`.
 Your app package is ready. To test it, upload it in your own tenant from **Teams admin center → Teams apps → Manage apps → Upload new app**. How customers install it is covered on [Send using your Teams app](/docs/microsoft-teams-customer-workspaces).
### 4. Let other directories install the app (SaaS)
Skip this if the bot only ever serves your own Microsoft Entra directory.
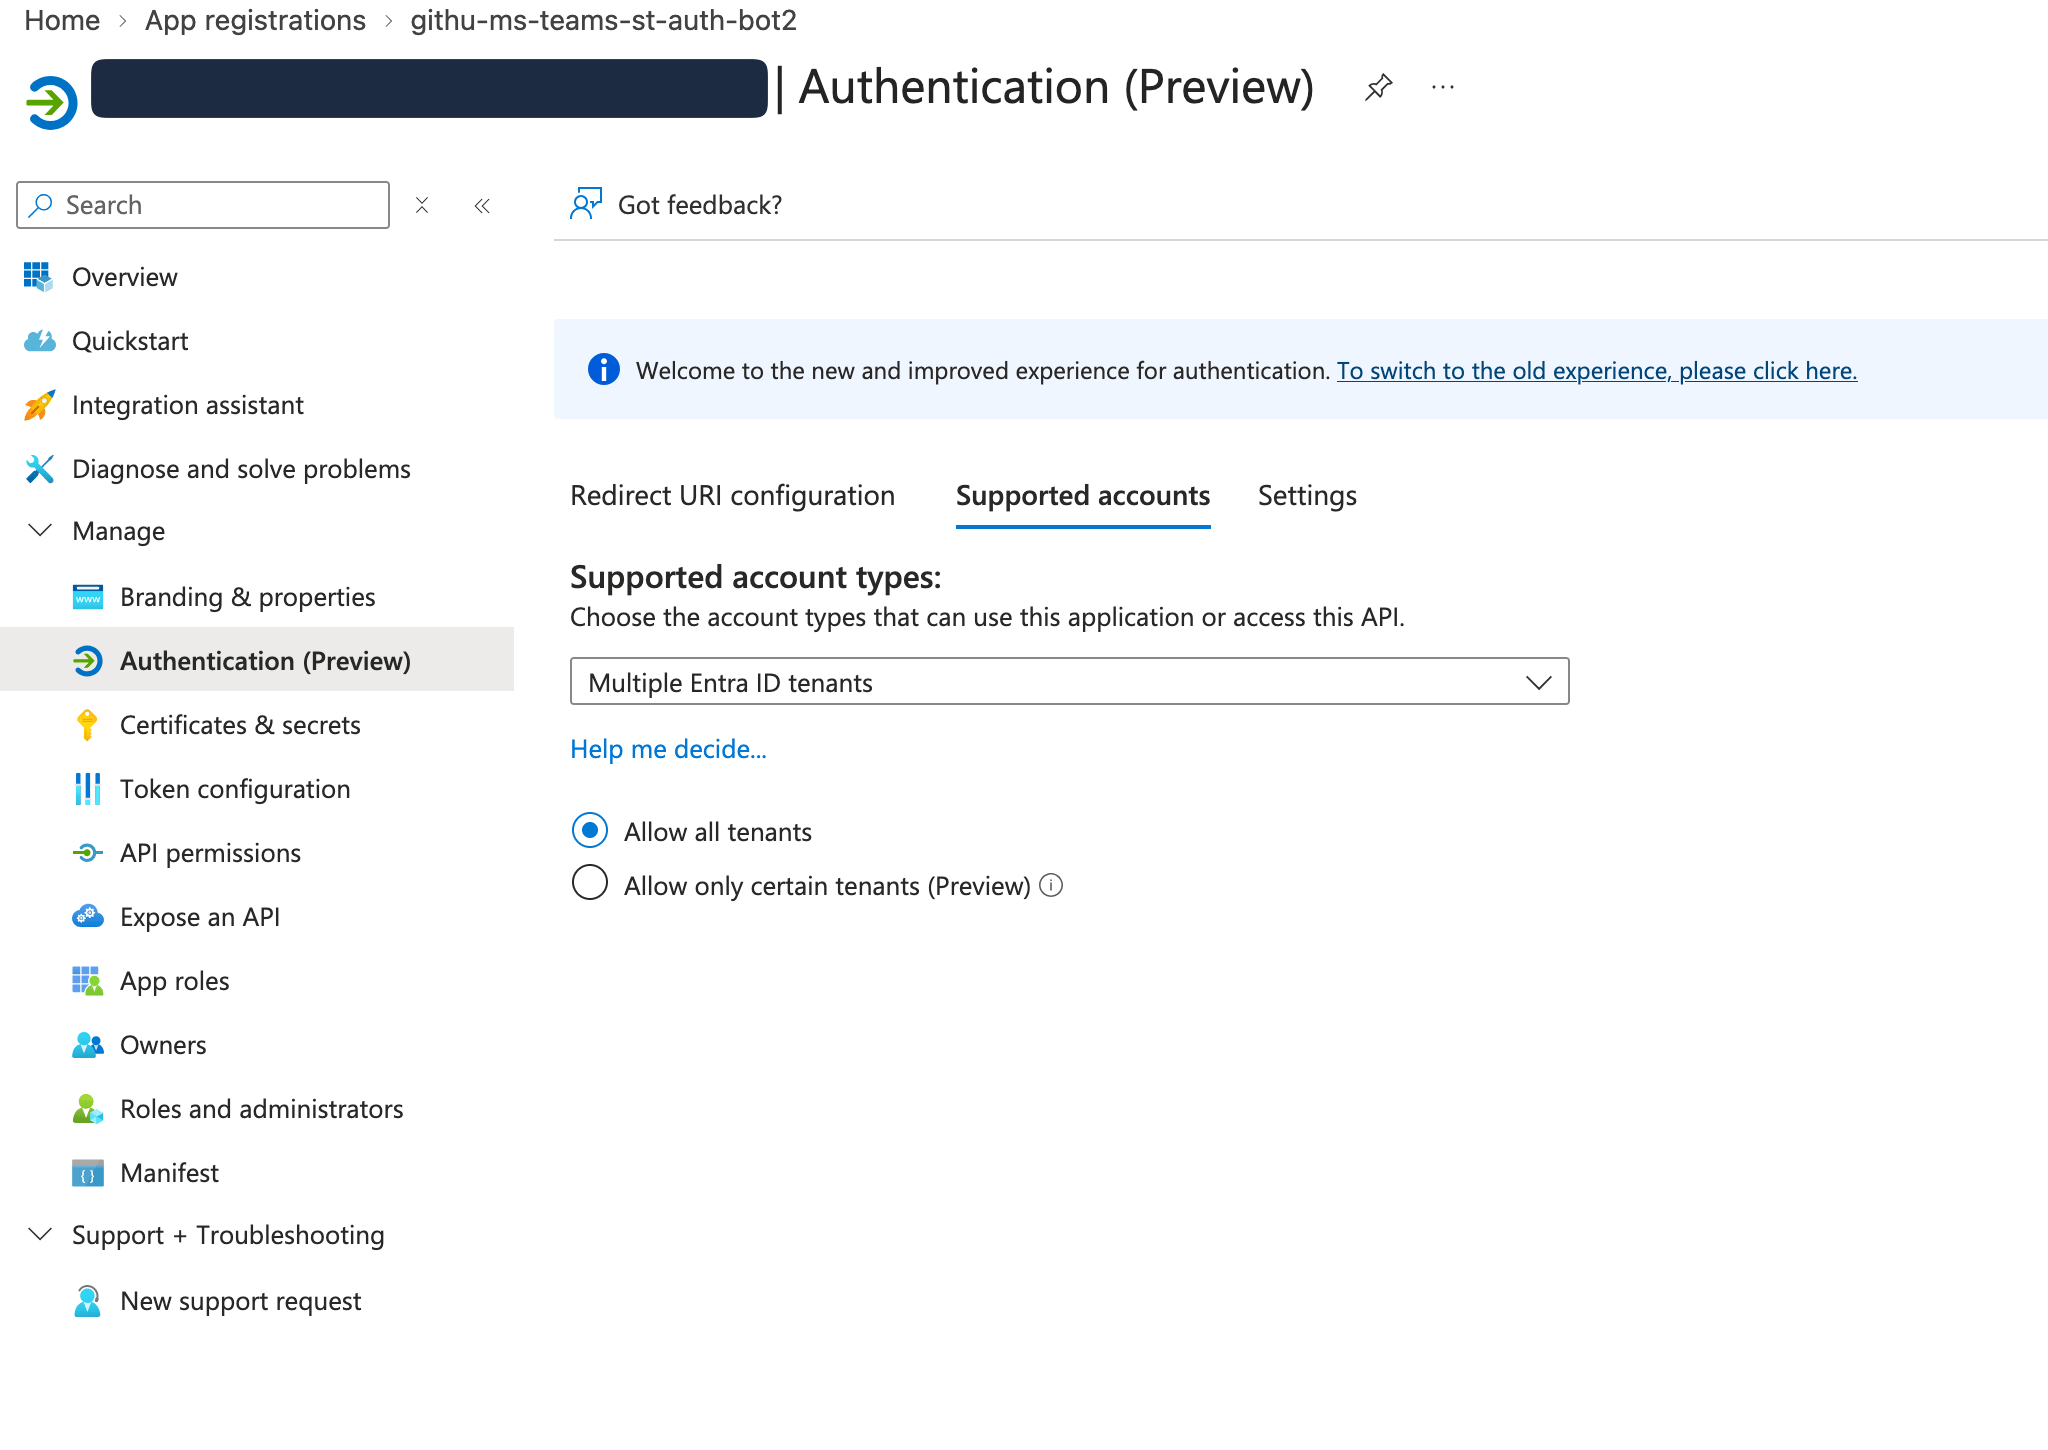
In the [Azure portal](https://portal.azure.com/), open **App registrations → your app → Authentication**, and set **Supported account types** to **Multiple Entra ID tenants**.
The bot still mints its token from *your* directory. This setting only lets other organizations install the app.
Your app package is ready. To test it, upload it in your own tenant from **Teams admin center → Teams apps → Manage apps → Upload new app**. How customers install it is covered on [Send using your Teams app](/docs/microsoft-teams-customer-workspaces).
### 4. Let other directories install the app (SaaS)
Skip this if the bot only ever serves your own Microsoft Entra directory.
In the [Azure portal](https://portal.azure.com/), open **App registrations → your app → Authentication**, and set **Supported account types** to **Multiple Entra ID tenants**.
The bot still mints its token from *your* directory. This setting only lets other organizations install the app.
 Until the app registration has a verified publisher (MPN ID), end users in those organizations cannot consent themselves — an administrator has to approve it.
### Alternative: create the bot with the Azure CLI
Prefer scripts over portal clicks? These commands do the **Azure side** of steps 2–4 — the app registration, its client secret, and the Azure Bot with the Teams channel enabled. They're useful if you provision infrastructure with scripts, or if you're setting up a bot inside a customer's subscription for the [customer's Teams app](/docs/microsoft-teams-customer-bot) use case.
They do **not** build the Teams app package (name, scopes, permissions). You still do that in the Developer Portal — steps 1 and 3 above — and attach the bot these commands create.
```bash theme={"system"}
# Your home directory. The bot authenticates against this tenant.
HOME_TENANT_ID=$(az account show --query tenantId -o tsv)
RG="incident-alerts"
BOT_NAME="incident-alerts-bot"
# 1. A resource group to hold the bot.
az group create --name "$RG" --location eastus
# 2. Register the Entra app. This is the same as Azure portal → App registrations.
# AzureADMultipleOrgs lets other organizations install your app (step 4).
# Use AzureADMyOrg if the bot will only ever serve your own directory.
APP_ID=$(az ad app create \
--display-name "Incident Alerts" \
--sign-in-audience AzureADMultipleOrgs \
--query appId -o tsv)
# 3. Create the client secret. It prints once — copy it. This is the
# Password on the SuprSend vendor form.
az ad app credential reset --id "$APP_ID" --append \
--display-name "suprsend" --years 2
# 4. Create the Azure Bot, bound to your home tenant. SingleTenant is the
# only option for new bots; MultiTenant fails after 31 July 2025.
az bot create \
--resource-group "$RG" \
--name "$BOT_NAME" \
--appid "$APP_ID" \
--app-type SingleTenant \
--tenant-id "$HOME_TENANT_ID" \
--sku F0 \
--location global
# 5. Enable the Microsoft Teams channel on the bot.
az bot msteams create --name "$BOT_NAME" --resource-group "$RG"
```
When it finishes you have the three values the vendor form needs: `$APP_ID` (Application ID), the secret printed in step 3 (Password), and `$HOME_TENANT_ID` (Tenant ID), with App Type `Single tenant`.
The CLI created the bot outside the Developer Portal, so it won't show up in the bot list there. Go back to step 3 in the [Teams Developer Portal](https://dev.teams.microsoft.com/), open your app → **App features → Bot**, and enter `$APP_ID` as the bot ID to attach it to your Teams app.
## Add the vendor in SuprSend
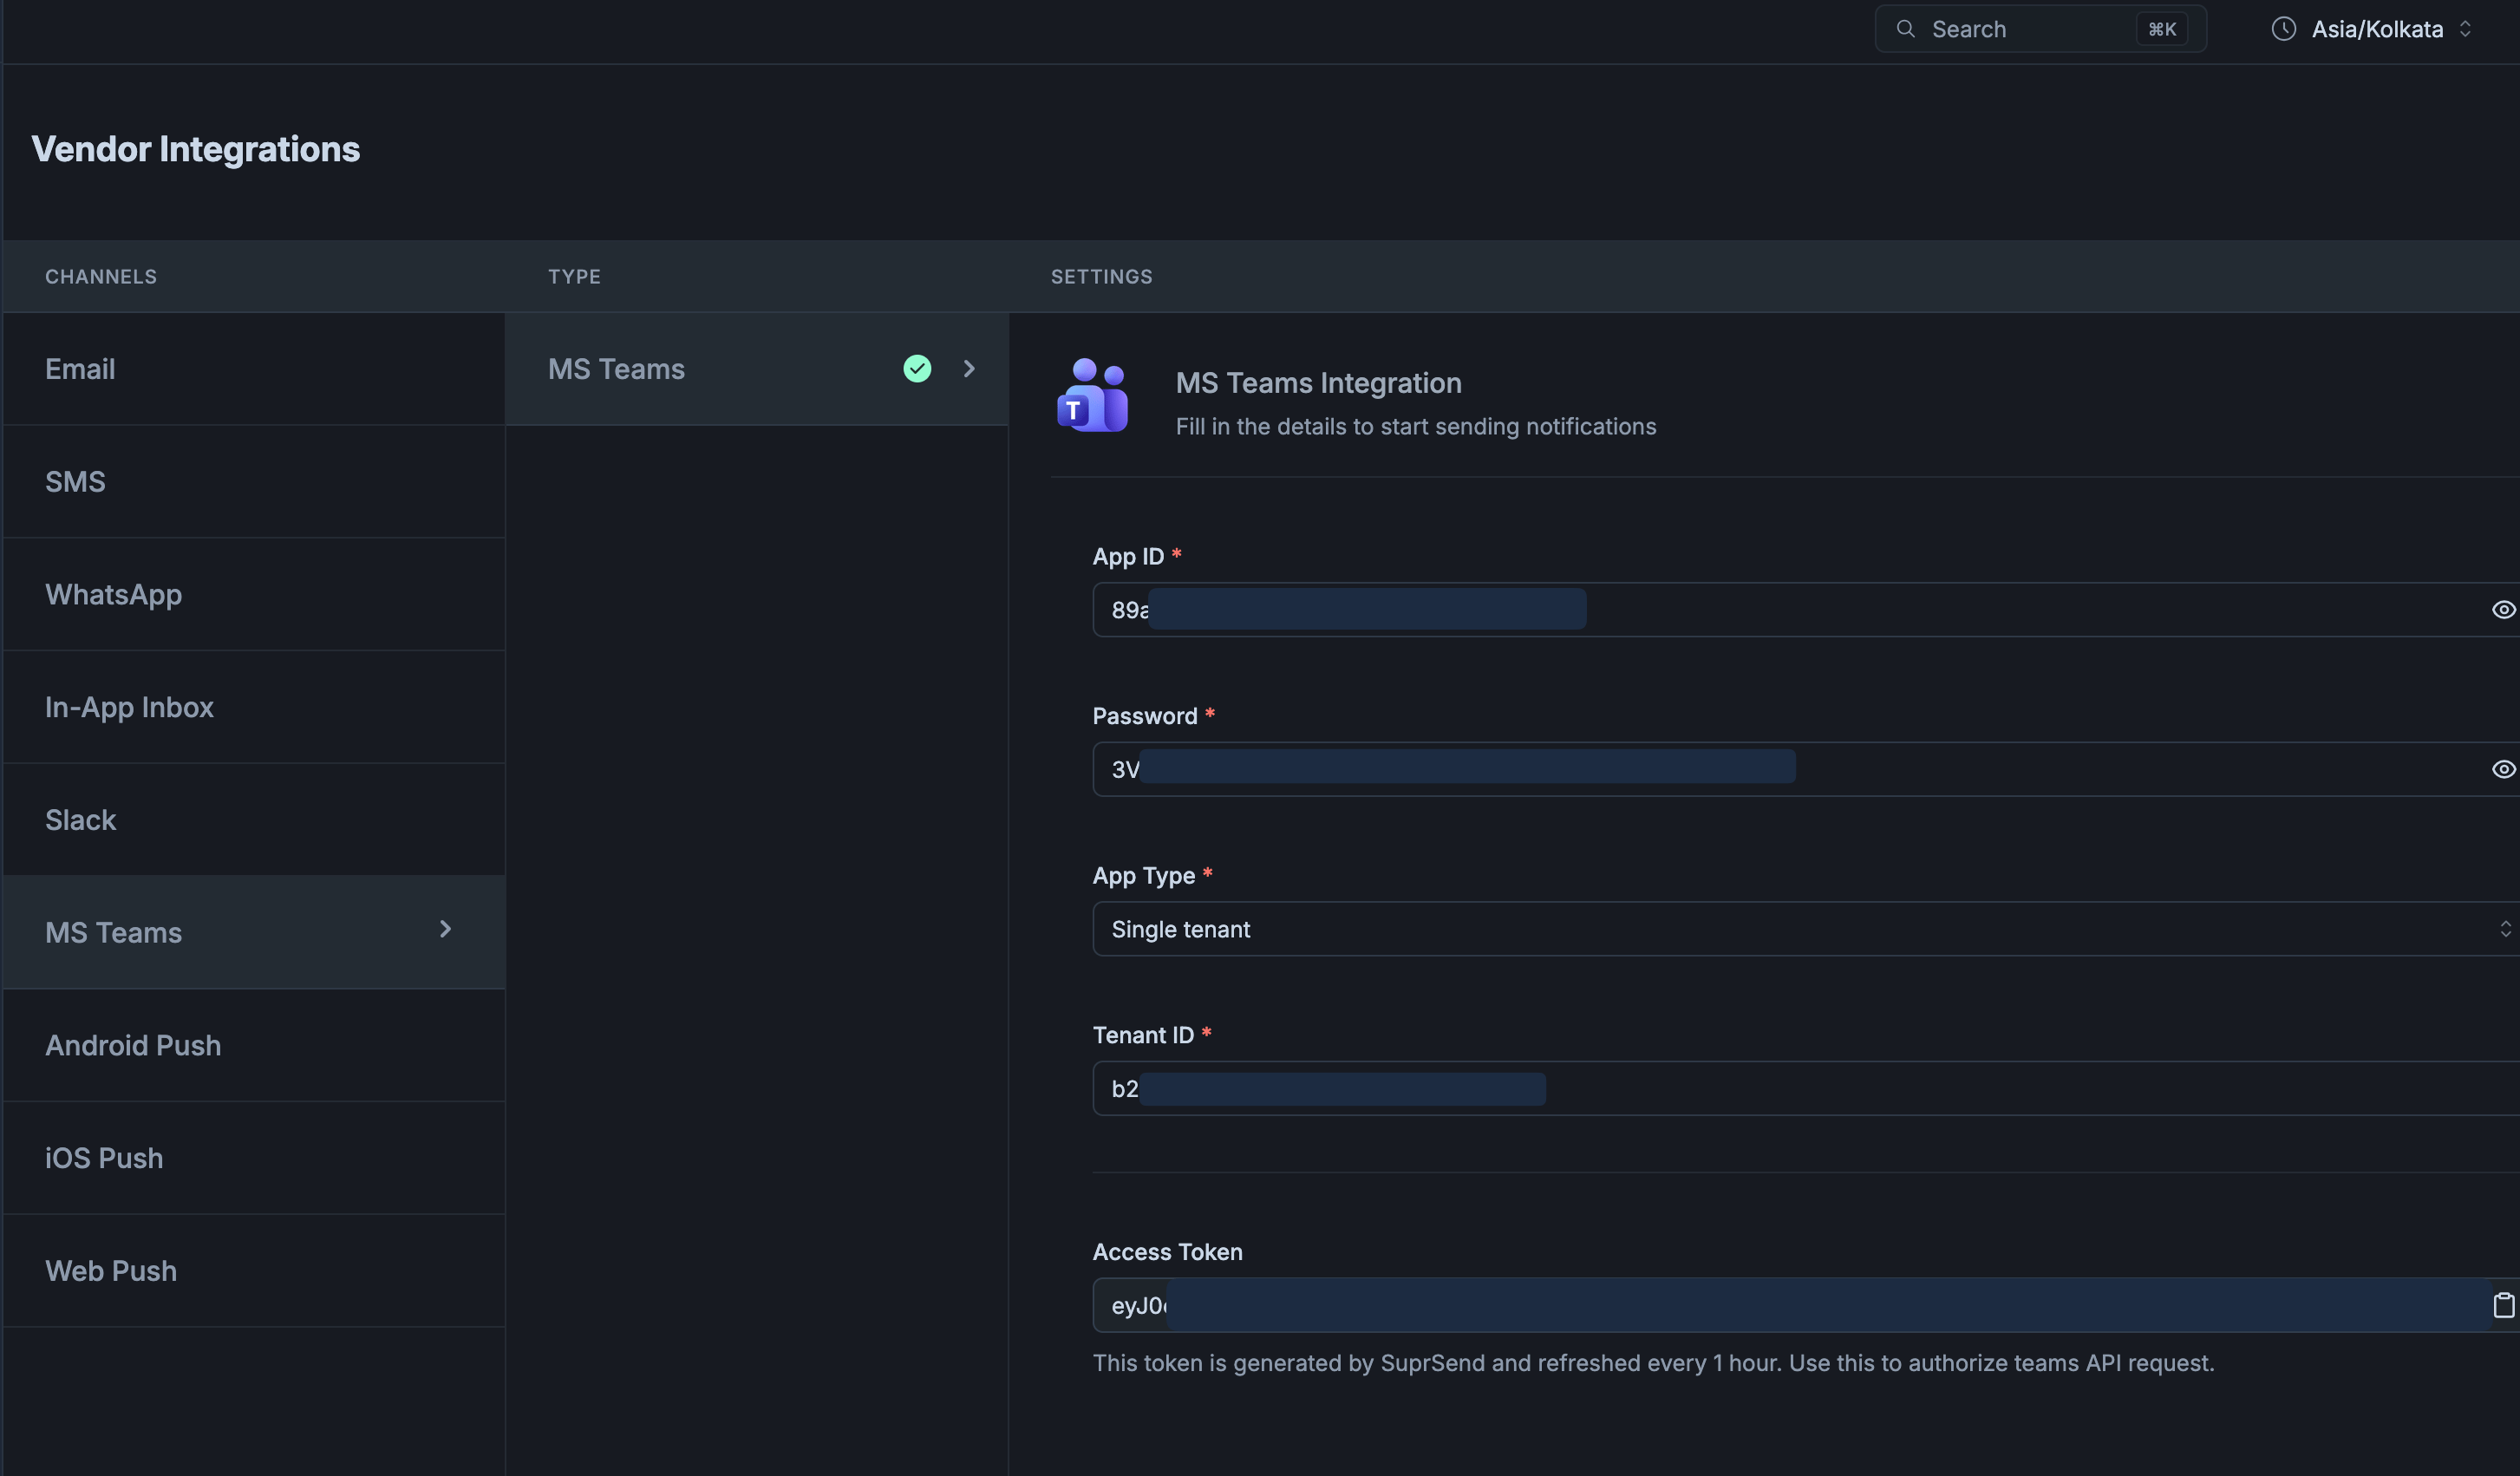
Go to **Vendors → Microsoft Teams** ([open vendor settings](https://app.suprsend.com/en/staging/vendors/ms_teams/ms_teams-ms_teams?tenant_id=default)). Add the **Application (client) ID** and the **client secret** (Password field).
Until the app registration has a verified publisher (MPN ID), end users in those organizations cannot consent themselves — an administrator has to approve it.
### Alternative: create the bot with the Azure CLI
Prefer scripts over portal clicks? These commands do the **Azure side** of steps 2–4 — the app registration, its client secret, and the Azure Bot with the Teams channel enabled. They're useful if you provision infrastructure with scripts, or if you're setting up a bot inside a customer's subscription for the [customer's Teams app](/docs/microsoft-teams-customer-bot) use case.
They do **not** build the Teams app package (name, scopes, permissions). You still do that in the Developer Portal — steps 1 and 3 above — and attach the bot these commands create.
```bash theme={"system"}
# Your home directory. The bot authenticates against this tenant.
HOME_TENANT_ID=$(az account show --query tenantId -o tsv)
RG="incident-alerts"
BOT_NAME="incident-alerts-bot"
# 1. A resource group to hold the bot.
az group create --name "$RG" --location eastus
# 2. Register the Entra app. This is the same as Azure portal → App registrations.
# AzureADMultipleOrgs lets other organizations install your app (step 4).
# Use AzureADMyOrg if the bot will only ever serve your own directory.
APP_ID=$(az ad app create \
--display-name "Incident Alerts" \
--sign-in-audience AzureADMultipleOrgs \
--query appId -o tsv)
# 3. Create the client secret. It prints once — copy it. This is the
# Password on the SuprSend vendor form.
az ad app credential reset --id "$APP_ID" --append \
--display-name "suprsend" --years 2
# 4. Create the Azure Bot, bound to your home tenant. SingleTenant is the
# only option for new bots; MultiTenant fails after 31 July 2025.
az bot create \
--resource-group "$RG" \
--name "$BOT_NAME" \
--appid "$APP_ID" \
--app-type SingleTenant \
--tenant-id "$HOME_TENANT_ID" \
--sku F0 \
--location global
# 5. Enable the Microsoft Teams channel on the bot.
az bot msteams create --name "$BOT_NAME" --resource-group "$RG"
```
When it finishes you have the three values the vendor form needs: `$APP_ID` (Application ID), the secret printed in step 3 (Password), and `$HOME_TENANT_ID` (Tenant ID), with App Type `Single tenant`.
The CLI created the bot outside the Developer Portal, so it won't show up in the bot list there. Go back to step 3 in the [Teams Developer Portal](https://dev.teams.microsoft.com/), open your app → **App features → Bot**, and enter `$APP_ID` as the bot ID to attach it to your Teams app.
## Add the vendor in SuprSend
Go to **Vendors → Microsoft Teams** ([open vendor settings](https://app.suprsend.com/en/staging/vendors/ms_teams/ms_teams-ms_teams?tenant_id=default)). Add the **Application (client) ID** and the **client secret** (Password field).
 | Field | What it is |
| - | - |
| **Application (client) ID** | Filled onto the app in Developer Portal when you attach the bot. Same value as Azure **App registration → Overview**. |
| **Password** | Bot client secret (shown only once when you created it) |
| **App Type** | Must match the **Azure Bot**. `Single tenant` for bots created after 31 July 2025. `Multi tenant` only for an older bot. |
| **Tenant ID** | The Microsoft Entra tenant **your bot is registered in**. Required for single-tenant. Not the customer's directory. |
Find **Tenant ID** in the [Azure portal](https://portal.azure.com/) under **Microsoft Entra ID → Overview → Tenant ID**, or on the app registration **Overview** as *Directory (tenant) ID*.
| Field | What it is |
| - | - |
| **Application (client) ID** | Filled onto the app in Developer Portal when you attach the bot. Same value as Azure **App registration → Overview**. |
| **Password** | Bot client secret (shown only once when you created it) |
| **App Type** | Must match the **Azure Bot**. `Single tenant` for bots created after 31 July 2025. `Multi tenant` only for an older bot. |
| **Tenant ID** | The Microsoft Entra tenant **your bot is registered in**. Required for single-tenant. Not the customer's directory. |
Find **Tenant ID** in the [Azure portal](https://portal.azure.com/) under **Microsoft Entra ID → Overview → Tenant ID**, or on the app registration **Overview** as *Directory (tenant) ID*.
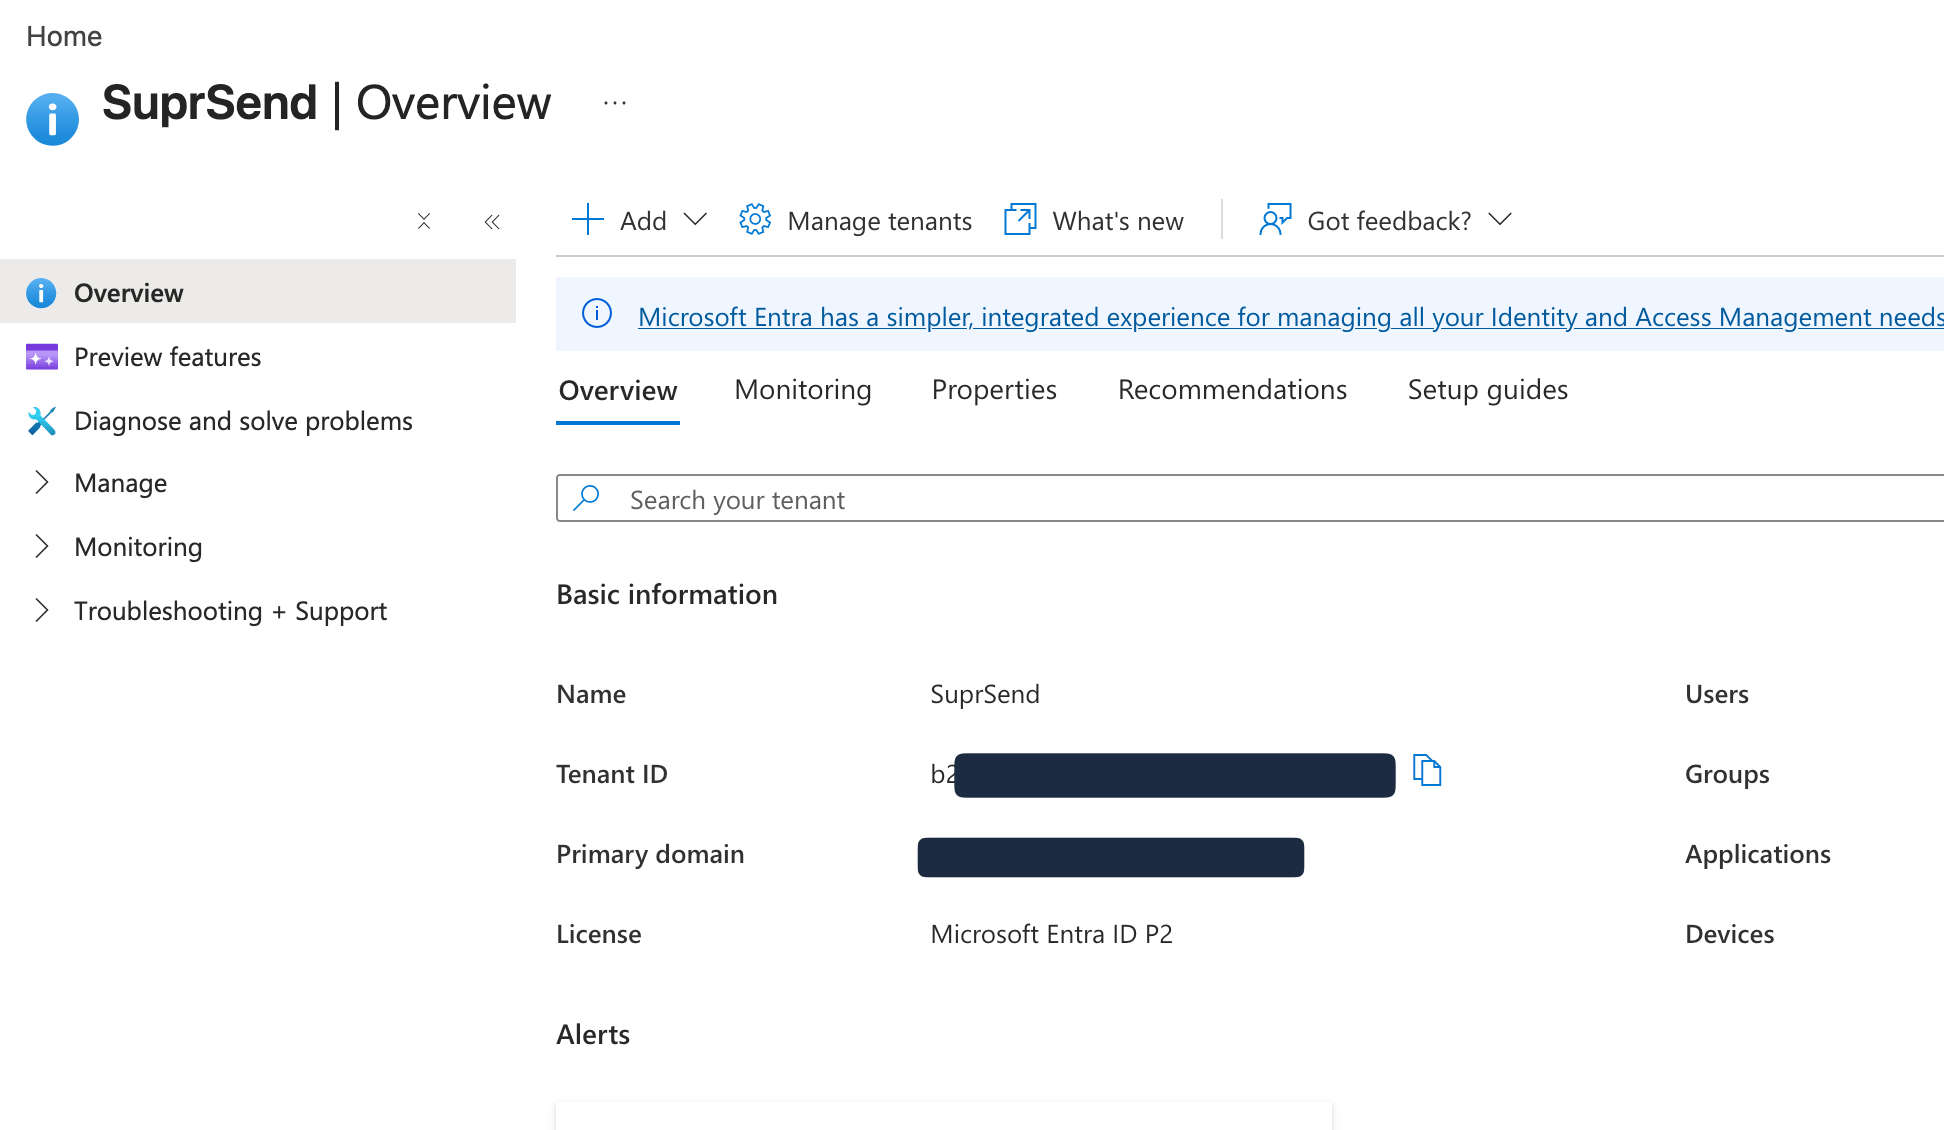 After you save, SuprSend tries to log in to Microsoft with these credentials and shows the result in the **Access Token** field on the same form.
If the field stays **empty**, the login failed. The usual cause is a wrong **Tenant ID** — it must be the directory the bot was created in, not a customer's.
If the field is **filled**, the login worked. Sends can still fail if **App Type** doesn't match the Azure Bot, so send one test message from your use-case page before going further. A `401 Authorization has been denied for this request` on that test means App Type is wrong.
**Tenant ID** on the vendor is the directory your **bot** is registered in. `tenant_id` on a user or object `$ms_teams` channel is the **recipient's** organization. They are the same value when the bot only serves its own directory. Once the bot serves several customers, a destination without its own `tenant_id` falls back to the vendor's and the send fails with `401`.
If an enterprise customer brings their own bot, those credentials go on a [tenant-level vendor](/docs/tenant-vendor) instead. See [Send via your customer's Teams app](/docs/microsoft-teams-customer-bot).
## Next
Customers install your app. DMs on users, channels on objects.
The customer registers the app in their own Entra directory and hands you the credentials.
This documentation is built and hosted on [Mintlify](https://mintlify.com), a developer documentation platform.
After you save, SuprSend tries to log in to Microsoft with these credentials and shows the result in the **Access Token** field on the same form.
If the field stays **empty**, the login failed. The usual cause is a wrong **Tenant ID** — it must be the directory the bot was created in, not a customer's.
If the field is **filled**, the login worked. Sends can still fail if **App Type** doesn't match the Azure Bot, so send one test message from your use-case page before going further. A `401 Authorization has been denied for this request` on that test means App Type is wrong.
**Tenant ID** on the vendor is the directory your **bot** is registered in. `tenant_id` on a user or object `$ms_teams` channel is the **recipient's** organization. They are the same value when the bot only serves its own directory. Once the bot serves several customers, a destination without its own `tenant_id` falls back to the vendor's and the send fails with `401`.
If an enterprise customer brings their own bot, those credentials go on a [tenant-level vendor](/docs/tenant-vendor) instead. See [Send via your customer's Teams app](/docs/microsoft-teams-customer-bot).
## Next
Customers install your app. DMs on users, channels on objects.
The customer registers the app in their own Entra directory and hands you the credentials.
This documentation is built and hosted on [Mintlify](https://mintlify.com), a developer documentation platform.